
Creating a tinfoil boat is a classic and enjoyable activity that combines simple physics with a dash of creativity. It’s a fantastic project for kids and adults alike, perfect for a rainy afternoon, a school science project, or simply for the fun of watching your creation float. This guide will walk you through everything you need to know to build a sturdy and buoyant vessel.
This project is more than just folding aluminum foil; it’s an accessible introduction to principles of engineering and naval architecture. You’ll learn about buoyancy, displacement, and structural integrity firsthand. Follow along as we provide step-by-step instructions on how to make a tinfoil boat, tips, and answers to common questions to ensure your boat-building experience is a resounding success.
Tools and Materials You’ll Need
Before we dive into the construction process, let’s go over the tools and materials you’ll need for this project. Here are some essential items that you should gather before starting:
- Aluminum foil (heavy-duty is recommended)
- Scissors or a craft knife
- Ruler or measuring tape
- Permanent marker
- Masking tape or painter’s tape
- Popsicle sticks or wooden skewers
- Small cups or containers for water
- Optional: Decorative materials such as stickers, paint, or markers to personalize your boat
7 Simple Step-By-Step Guidelines on How to Make a Tinfoil Boat
Step 1: Prepare Your Foil Sheet
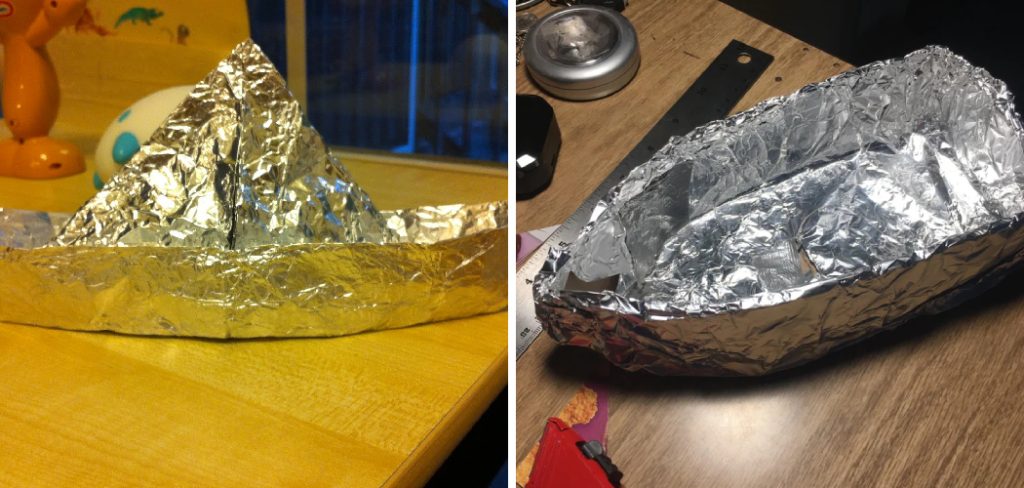
The foundation of a good tinfoil boat is a solid, well-prepared base. Start by tearing off a rectangular sheet of heavy-duty aluminum foil. A good starting size is approximately 12 inches by 18 inches, but you can adjust this depending on the size of the boat you wish to create.
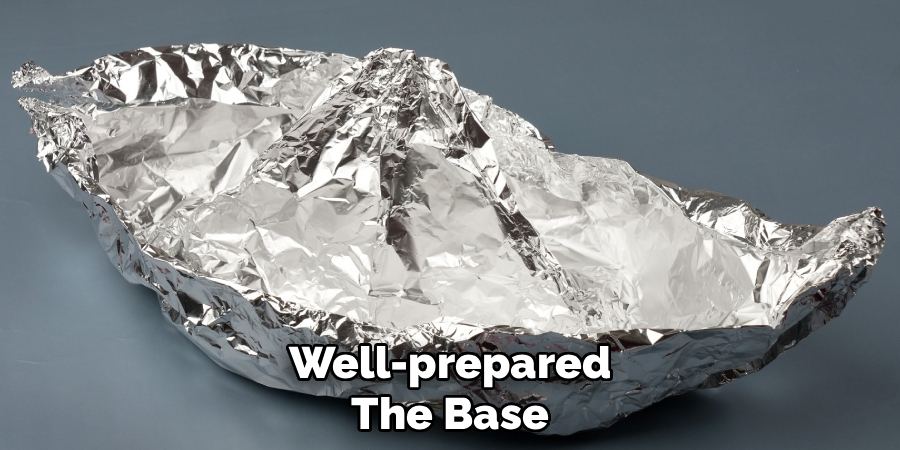
It’s very important to handle the foil carefully to avoid creating any accidental wrinkles or small tears, as these can become weak points where water might later seep in. Lay the sheet flat on your workspace and gently smooth out any existing creases with the palm of your hand.
For added strength and durability, consider using a double layer of foil. To do this, simply take your first sheet and lay another sheet of the exact same size directly on top of it. Carefully press the two layers together, smoothing them from the center outwards to eliminate any air bubbles trapped between them. This reinforced material will create a much more robust hull, giving your boat greater structural integrity and allowing it to carry more weight without buckling or tearing. A strong base is the first step toward a successful launch.
Step 2: Form the Basic Hull Shape
Now it’s time to create the basic structure of your boat’s hull. With your foil sheet laid out, fold all four edges inward by about one inch. Use your ruler to ensure the folds are straight and press down firmly to create sharp, defined creases. These folded edges will become the walls of your boat, providing the height needed to keep water out. Making these initial folds uniform is essential for creating a balanced and stable vessel. An uneven wall height could cause the boat to list to one side when placed in the water.
After folding the edges, you will have a smaller rectangle with reinforced sides. This simple shape is the starting point for your hull. Double-check that the creases are crisp and secure. Go over them again with your thumbnail or the edge of the ruler to make them as tight as possible. This process not only forms the walls but also adds another layer of rigidity to the overall structure. A well-defined frame at this stage makes the subsequent steps much easier and results in a more professional-looking and better-performing boat.
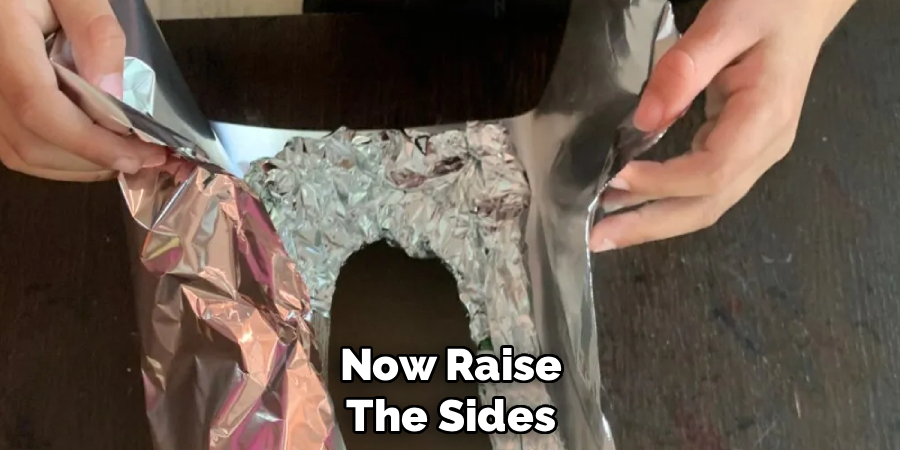
Step 3: Raise the Sides
With the initial folds complete, you can now raise the sides to give your boat its three-dimensional shape. Gently lift the four folded edges upwards to a 90-degree angle from the base. Be careful and deliberate in your movements to avoid tearing the foil at the corners, which are now under some tension. The goal is to create a rectangular, tray-like shape. This structure will form the main compartment of your boat, designed to displace water and hold your cargo.
Once the walls are upright, you will need to address the corners. You’ll notice that the corners are open and need to be sealed to make the boat watertight. Pinch the excess foil at each corner together, folding it flat against one of the sides. Think of it like wrapping a present. You can fold the corner flap either inside or outside the boat, but folding it against the exterior wall often results in a cleaner interior space and adds a bit of extra reinforcement to the outside of the hull. Ensure these corner folds are pressed down firmly to create a seal.
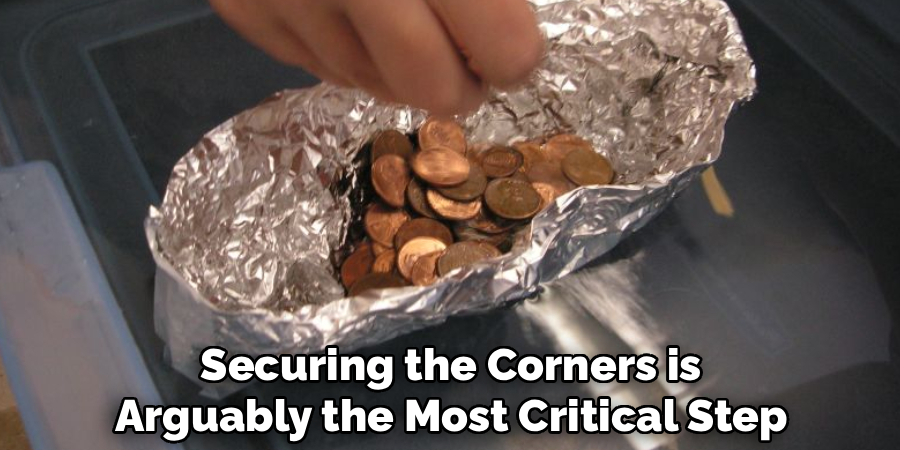
Step 4: Seal and Reinforce the Corners
Securing the corners is arguably the most critical step in making your boat waterproof. A small leak in a corner can quickly lead to a sunken ship. After you have pinched and folded the corner flaps against the walls, you need to make sure they are completely sealed. Carefully and firmly press along the entire length of the folded corner seam. You can use your fingers or the smooth edge of a ruler for this task. Apply consistent pressure to meld the layers of foil together, leaving no gaps for water to penetrate.
For extra security, you can fold the top edge of the corner flap over the rim of the boat’s wall. This action essentially locks the corner fold in place and adds another layer of protection against leaks. Take your time with this step and inspect each corner closely. Hold the boat up to a light source to check for any tiny pinholes or gaps in the foil, especially along the corner seams you just created. If you find any potential weak spots, you can patch them with a small, carefully applied piece of extra foil.
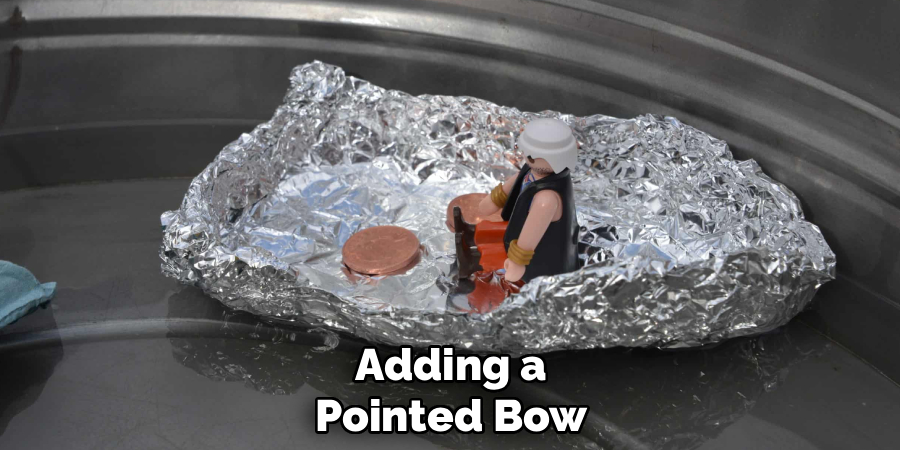
Step 5: Shape the Bow and Stern
While a simple rectangular barge shape will float, adding a pointed bow (the front) and a defined stern (the back) can improve your boat’s stability and hydrodynamics. Decide which of the shorter sides will be the front of your boat. Gently pinch the two corners at that end together and squeeze them inward, forming a pointed shape. This creates a bow that can cut through the water more effectively than a flat front, reducing resistance and helping the boat move more smoothly.
For the stern, you can either leave it flat or fold it slightly to create a transom. A flat stern is perfectly fine and provides good stability. To shape it, simply ensure the back wall is straight and well-creased. If you want a more advanced design, you can gently curve the back wall or create small folds to change its shape. The key is to maintain symmetry. Whatever design you choose for the bow and stern, try to make it as symmetrical as possible to prevent the boat from turning or tipping unexpectedly.
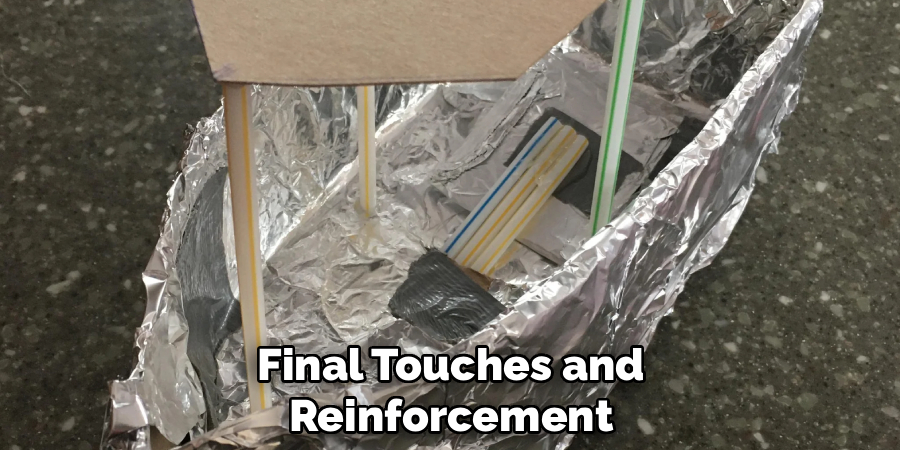
Step 6: Final Touches and Reinforcement
Before you prepare for the maiden voyage, take a moment to inspect your entire vessel and make final reinforcements. Run your fingers along all the walls and the base of the boat, smoothing out any significant wrinkles. While some texture is unavoidable, large creases can become weak points. Pay special attention to the bottom of the hull; a smooth, flat base will provide the most stability. You can gently press the base against your flat work surface to ensure it is level.
This is also a good time to reinforce the upper edges, or gunwales, of your boat. You can do this by carefully folding the top half-inch of the walls outward or inward, creating a thicker, more rigid rim. This simple fold dramatically increases the strength of the walls, preventing them from collapsing inward under the weight of the cargo or the pressure of the water. A strong rim is crucial for maintaining the boat’s shape and integrity, especially as you begin to add weight during testing.
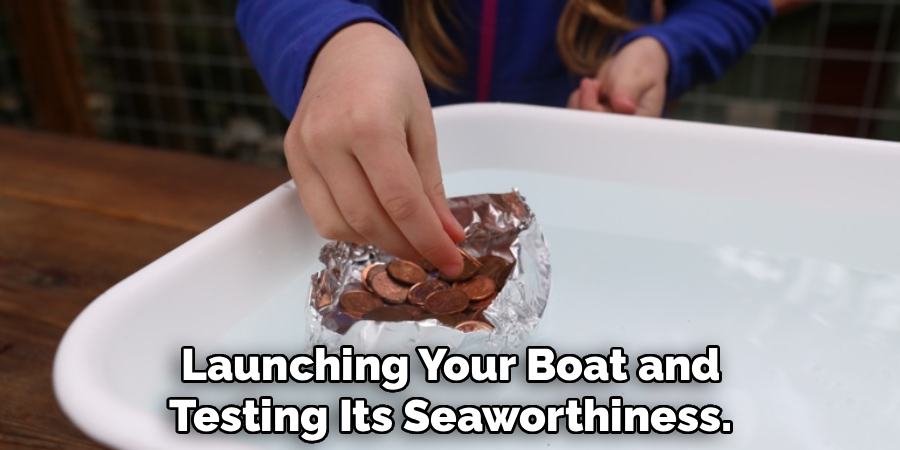
Step 7: Test the Buoyancy
The most exciting part has arrived: launching your boat and testing its seaworthiness. Gently place your newly constructed tinfoil boat into your container of water. It should float easily on the surface. If it tilts to one side, it may be asymmetrical. You can carefully remove it and make small adjustments to the folds and shape to improve its balance. Once it is floating level, you can begin to test its cargo capacity. Start by adding one penny or marble at a time to the center of the boat.
Distributing the weight evenly is crucial for maintaining stability. As you add more weight, place the items carefully to keep the boat balanced. Count how many pennies your boat can hold before it starts to take on water or sink. This number is its maximum payload. You can use this experience to iterate on your design. Try building another boat with a wider base, taller sides, or a different hull shape to see if you can increase its carrying capacity. This process of testing and refinement is the heart of the engineering design cycle.
Following these steps on how to make a tinfoil boat can not only be a fun and engaging activity, but it also teaches important concepts in engineering and physics. By using simple materials and following the design process, you can create a boat that is capable of holding a surprising amount of weight.
Common Mistakes to Avoid
When building your boat, be careful not to make the walls too short, as water can easily splash over the sides. Avoid creating sharp, deep wrinkles or creases in the main body of the hull, as these points are prone to tearing.
Don’t rush the corner-sealing step; this is where most leaks occur. Also, be sure to distribute the weight of your cargo evenly instead of piling it all in one spot, which can cause the boat to capsize. Finally, resist the temptation to use standard kitchen foil if possible, as it is much more fragile.
How Much Will It Cost?
One of the best aspects of this project is its incredibly low cost. The primary material, aluminum foil, is a common household item. A roll of heavy-duty foil typically costs between $4 and $8 and will provide enough material to build dozens of boats.
The other necessary items—scissors, a ruler, and pennies for weights—are things that most people already have at home. Therefore, the cost for a single boat is just a few cents. If you do need to purchase a roll of foil specifically for this project, it is a very small investment for hours of creative and educational fun.
Q1: How Can I Make My Tinfoil Boat Hold More Weight?
A1: To increase your boat’s cargo capacity, focus on maximizing its water displacement. The most effective way to do this is by creating a boat with a wide, flat base and tall, sturdy sides. A larger surface area on the water provides more upward buoyant force.
Using a double layer of heavy-duty foil will also create a stronger hull that can withstand more weight before buckling. Finally, ensure the weight is distributed as evenly as possible inside the boat.
Q2: Why Does My Tinfoil Boat Keep Tipping Over?
A2: A boat that tips over is likely suffering from a stability issue. This is usually caused by an asymmetrical design or uneven weight distribution. Make sure your boat’s left and right sides are mirror images of each other.
Use a ruler during construction to ensure your folds are uniform. When adding cargo, place it low and in the center of the boat to maintain a low center of gravity. A high center of gravity will make the vessel much more prone to capsizing.
Q3: Can I Add a Motor to My Tinfoil Boat?
A3: While adding a conventional motor is not practical, you can create a simple propulsion system. One popular method is to use surface tension. Cut a small notch in the stern of your boat and place a tiny drop of dish soap in it.
The soap will break the surface tension of the water behind the boat, creating a thrust that propels it forward. This is a great way to add another layer of scientific discovery to your project and see your creation move on its own.
Conclusion
Building a tinfoil boat is a simple yet deeply rewarding project that offers endless opportunities for creativity and learning. By following this guide on how to make a tinfoil boat, you have learned how to construct a buoyant vessel, test its limits, and troubleshoot common issues.
The real magic, however, comes from experimentation. Now that you understand the basic principles, you can design, build, and test countless variations. So grab a roll of foil, gather your materials, and set sail on your own engineering adventure.